
Learn How to Draw a Cute Cartoon Dog
Learn how to draw a Cute Cartoon Dog with this easy step-by-step guide designed for kids, beginners, and animal lovers. Even if you’ve never drawn before, you’ll be able to create an adorable cartoon puppy using simple shapes and smooth lines.
This tutorial includes clear steps, helpful tips to improve your drawing, and common mistakes to avoid—so you can draw with confidence and create a cute puppy full of charm and personality.
Difficulty Level: Easy
Time Needed: 30-35 Minutes
Last Update On: May 03, 2026 | Posted On: May 03, 2026
Material Needed:
- Pencil & Eraser – for sketching and fixing mistakes
- Drawing Paper – plain white paper or a sketchbook
- Colors – crayons, colored pencils, or markers
- Black Marker – for outlining the Cute Dog drawing
- Sharpener – to keep your pencil ready
Colors Used in This Dog Drawing:
- Body: Light cream / soft beige
- Ears, Tail, and Patches: Warm brown
- Nose: Black
- Tongue: Pinkish red
Before You Start Drawing
- Keep your pencil light – you’ll erase guidelines later
- Draw on a flat, clean surface
- Keep your colors ready (Red, Green, White, Gold)
- Don’t worry about perfection – practice makes progress
Step-By-Step instructions for Cute Cartoon Dog Drawing
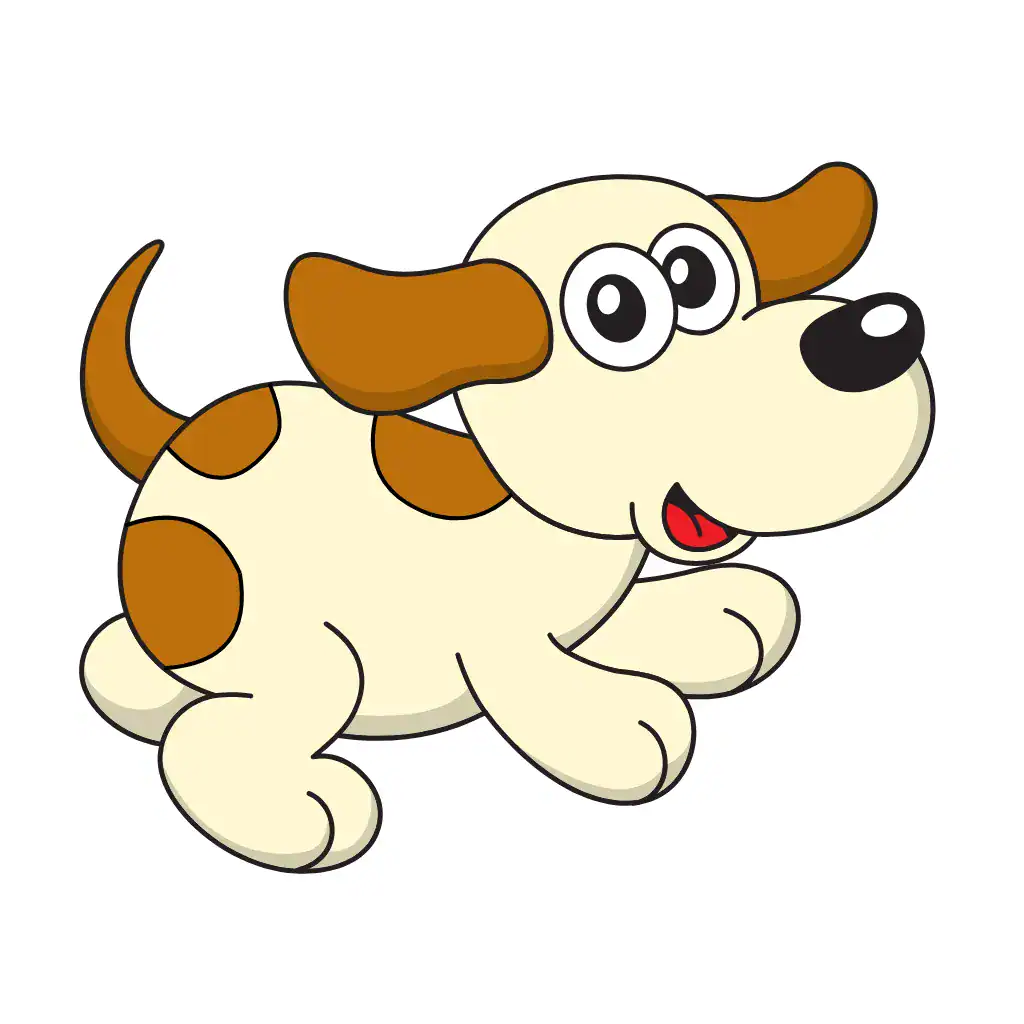
Download drawing PDF for Free, Learn and draw Cute Joyful Dog with help of easy Instructions
Step 1: Draw the Dog’s Head and Ear Outline

Start your dog drawing by creating the basic head and ear shape:
- Draw a large, smooth curved line to form the upper part of the dog’s head
- Add one floppy ear on the side using soft, rounded curves
- Sketch a small curved line near the bottom to begin shaping the cheek or muzzle area
- Keep all lines loose and rounded to create a cartoon look
Tip: Use light pencil strokes in the beginning so you can easily adjust the head shape and ear position if needed.
Step 2: Add the Dog’s Cute Nose

Continue your dog drawing by adding a shiny cartoon nose:
- Draw a small oval shape near the front of the face for the nose
- Fill in the nose, leaving a tiny highlight area uncolored for shine
- Position it slightly below the ear line to keep the face balanced
- Keep the shape soft and rounded for a cute puppy look
Common Mistake: Avoid making the nose too large or placing it too low—this can throw off the proportions of your dog’s face.
Step 3: Draw the Dog’s Big Cartoon Eyes

Bring your dog art to life by adding bright, expressive eyes:
- Draw two large, round eyes close to each other in the center of the face
- Add smaller circles inside each eye for the pupils and shiny highlights
- Fill in the pupils while keeping the highlight areas white
- Slightly overlap the eyes to create a playful, cute puppy expression
Tip: Keep both eyes at the same height and size—balanced eyes instantly make your dog look more adorable and expressive.
Step 4: Add the Dog’s Muzzle and Happy Smile
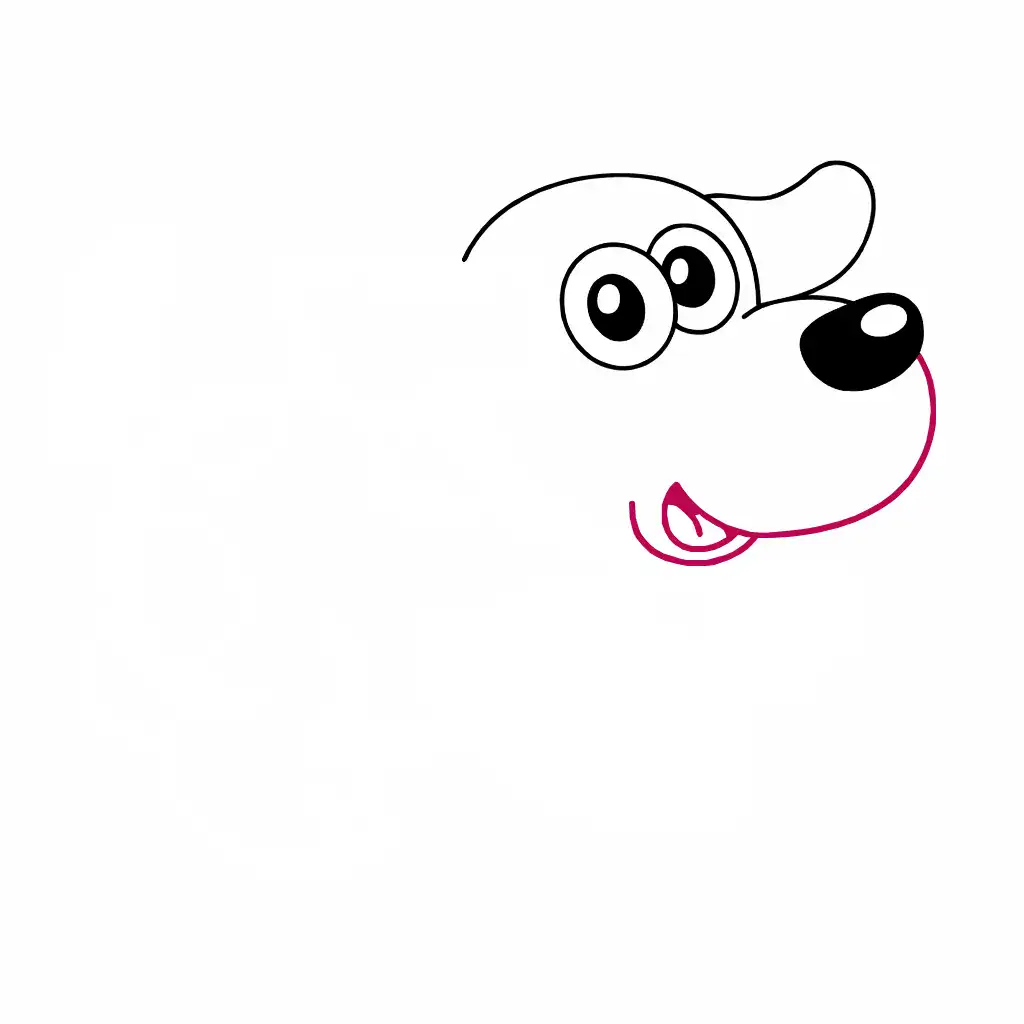
Continue your dog sketch by shaping the muzzle and cheerful mouth:
- Draw a large, rounded curve starting from the nose to form the muzzle
- Extend the line downward and around to create the lower face shape
- Add an open smiling mouth underneath with a small tongue inside
- Keep the curves smooth and soft to match the adorable style
Common Mistake: Avoid making the muzzle too pointed or too narrow—rounded facial shapes help the puppy artwork look softer and more lovable.
Step 5: Draw the Second Ear and Complete the Face Shape
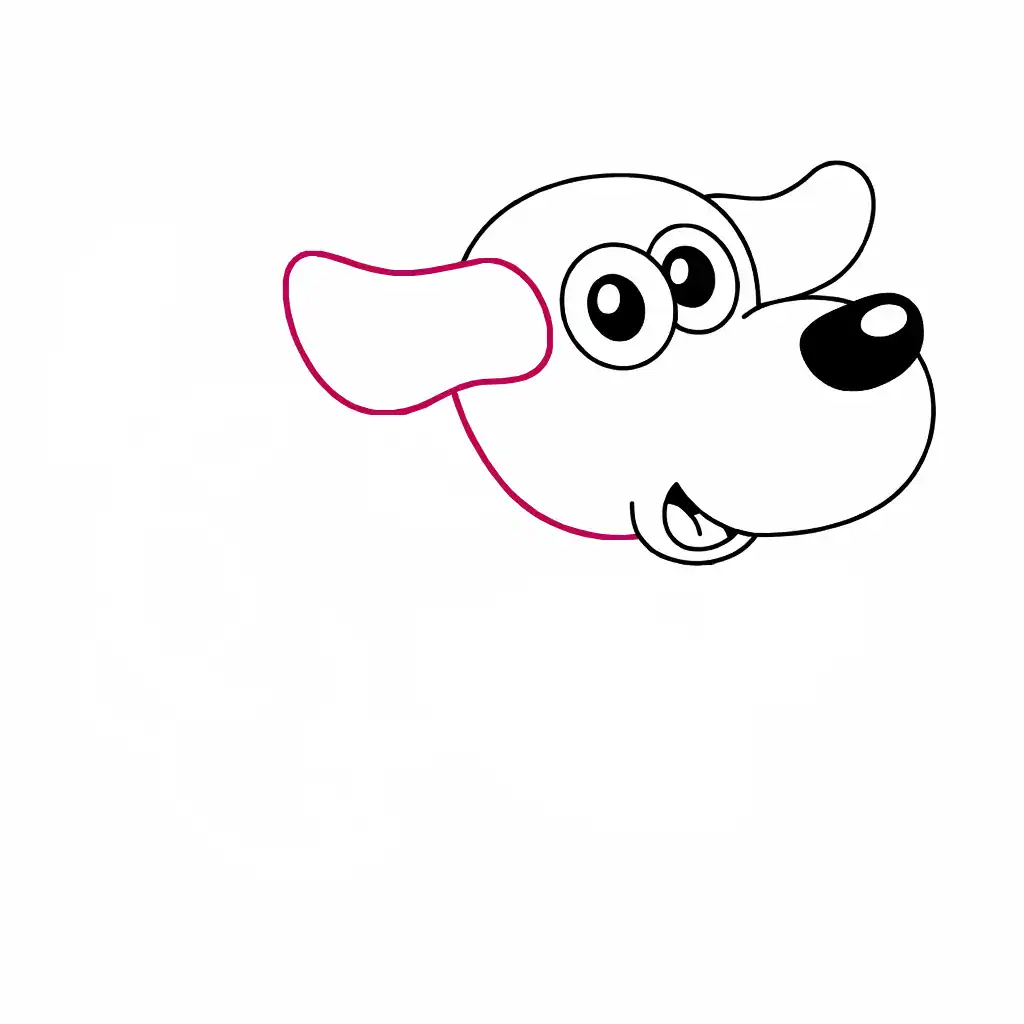
Continue your puppy artwork by adding the second floppy ear and finishing the face outline:
- Draw a large floppy ear on the opposite side using soft, rounded curves
- Connect the ear smoothly to the head to complete the side of the face
- Extend the lower jawline gently toward the mouth area
- Keep both ears slightly different for a more natural cartoon look
Tip: Let the ears flow naturally instead of making them perfectly symmetrical—small variations add more charm and personality to the dog illustration.
Pause and check: Is your Cute Doggy Face shape balanced? If any line looks uneven, fix it now before adding more details
Loved this Cute Joyful Dog drawing? Try these easy tutorials next and level up your skills!
Step 6: Draw the Dog’s Back and Body Outline

Continue your dog illustration by sketching the upper body shape:
- Draw a long, smooth, curved line starting behind the ear
- Extend the curve backward and downward to form the back and body
- Keep the body shape wide and rounded for a soft puppy look
- Let the line flow naturally without sharp corners
Common Mistake: Avoid making the body too small compared to the head— adorable animals usually have a larger head, but the body still needs enough size to look balanced.
Step 7: Draw the Dog’s Front Legs and Paws

Continue your puppy sketch by adding the front legs in a playful pose:
- Draw two soft, curved leg shapes coming down from the neck area
- Make each paw large, rounded, and slightly bent for an engaging feel
- Add small curved lines near the paws to separate the toes
- Let one leg overlap slightly in front of the other for more depth
Tip: Rounded paws instantly make a puppy artwork look softer, younger, and more adorable, so avoid sharp edges.
Step 8: Draw the Back Legs

Continue your dog artwork by finishing the lower body details:
- Draw two rounded back legs near the rear of the body
- Make the paws soft, chunky, and slightly curved for a playful puppy look
- Add a small curved tail behind the body
- Connect the belly line smoothly between the front and back legs
Common Mistake: Avoid making the back legs too small or placing them too close together—balanced spacing helps the puppy illustration look natural and stable.
Step 9: Add the Tail and Cute Body Spots
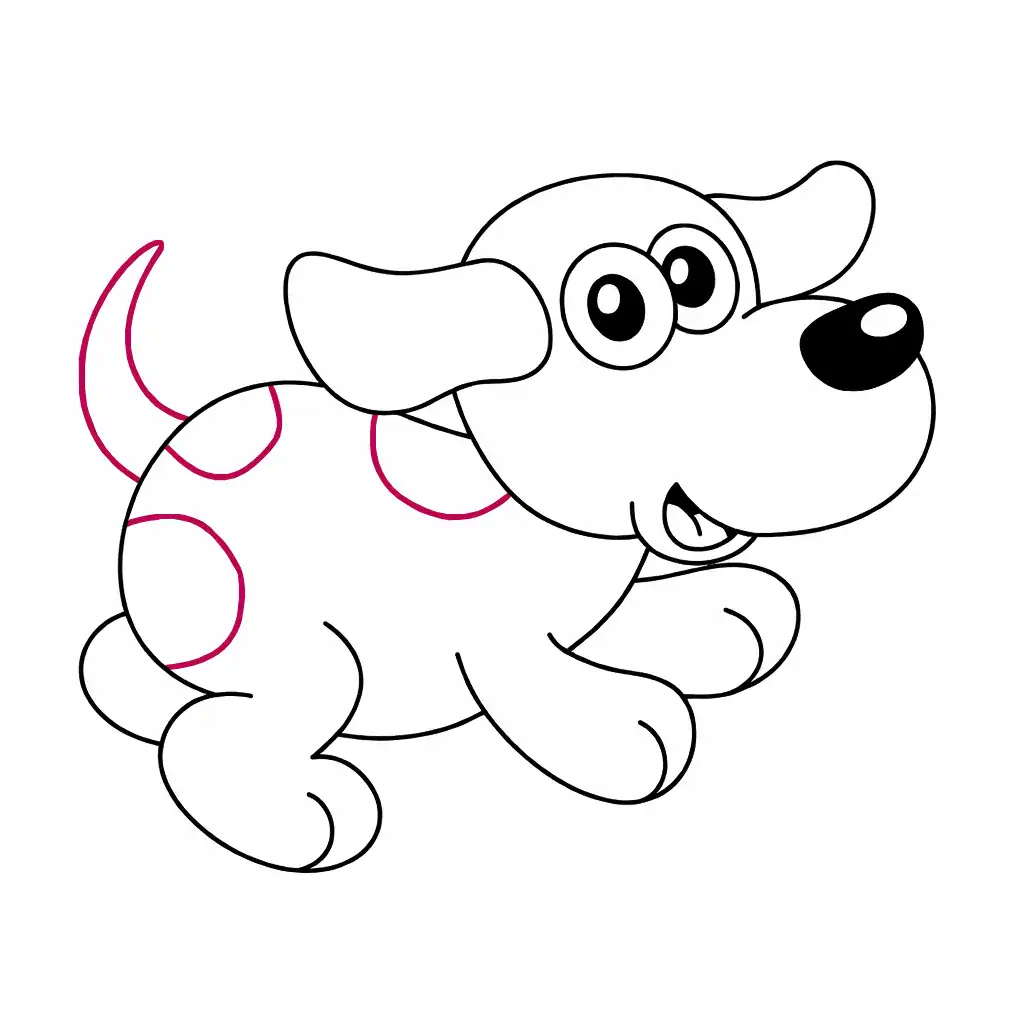
Bring your puppy illustration to life by adding playful details:
- Draw a curved, upward tail at the back of the body
- Add a few rounded patch shapes on the body and near the neck
- Keep each spot soft, uneven, and naturally placed
- Space the markings nicely to give the puppy more personality
Tip: Make each spot slightly different in size and shape—natural variations make the dog artwork look more charming and less repetitive.
Pause before coloring – double-check your outlines first. If something looks off, correct it now before moving ahead.
Step 10: Color Your Cute Cartoon Dog
Complete your dog artwork by adding warm colors and soft shading:
- Use a light cream or beige color for the main body and face
- Fill the ears, tail, and body spots with warm brown tones
- Color the tongue red or pink to make the smile stand out
- Add soft shadows around the paws, ears, and body curves for extra depth
- Keep the highlights bright to make the puppy illustration look lively and polished
Common Mistake: Avoid using colors that are too dark or flat without shading—soft color variation helps the puppy artwork look more vibrant, cute, and full of life.
Great job!
You’ve completed your Cute Cartoon Dog Drawing
Awesome work! You’ve created an adorable cartoon puppy from start to finish—keep practicing your drawing skills and try creating more cute animal illustrations next time!
Cute Dog Drawing Process Overview – From Start to Finish

How to Make Your Dog Drawing Look More Realistic
- Use smooth, flowing curves to keep your puppy’s body soft and natural
- Keep the head, body, legs, and ears in balanced proportions
- Add light shading around the face, paws, and body to create depth
- Follow natural muscle curves instead of drawing stiff straight lines
- Make the eyes bright and expressive by leaving small highlight areas
- Use slightly varied spots, ears, and tail shapes for a more natural cartoon look
- Keep outlines clean and confident for a polished final illustration
Common Mistakes to Avoid
- Starting with an oversized head or tiny body
Cute cartoon puppies often have larger heads, but the body still needs proper balance. If the proportions feel off early, the whole dog sketch can look awkward later. - Drawing ears that look stiff or identical
Puppy ears should feel soft and relaxed. Avoid making both ears perfectly symmetrical—small natural variations add more personality and charm. - Making the paws too small or too sharp
Rounded paws help create a soft, playful cartoon style. Tiny or pointed paws can make the puppy artwork look less cute and less balanced. - Placing the eyes too far apart or unevenly
The eyes are the main focus of the face. Uneven eye placement can make the dog illustration look cross-eyed or unbalanced. - Using flat colors without highlights or shading
Even simple shading around the ears, body spots, and paws can make your dog artwork look more lively, polished, and professional.
Time breakdown for Each Step
| Step | Time |
|---|---|
| 1. Head & Ear | 3 min |
| 2. Nose | 2 min |
| 3. Eyes | 3 min |
| 4. Muzzle & Smile | 4 min |
| 5. Second Ear | 3 min |
| 6. Back & Body | 4 min |
| 7. Front Legs | 4 min |
| 8. Back Legs | 3 min |
| 9. Tail & Spots | 3 min |
| 10. Coloring | 8-10 min |
| Total | 35-40 min |
Pro Tip for Parents/Teachers
| Age Group | Expected Time |
|---|---|
| 4-6 years (with help) | 45-50 minutes |
| 7-10 years (alone) | 35-40 minutes |
| 11+ years / Adults | 25-30 minutes |
Frequently Asked Questions (FAQ)
Q1. What is the first step to draw a cute dog?
Start by sketching the basic head shape along with one floppy ear. This helps you build the facial structure and makes it easier to place the eyes, nose, and mouth correctly.
Q2. Is this dog drawing tutorial suitable for beginners?
Yes, this cute dog drawing tutorial is perfect for beginners, kids, and anyone learning to sketch. The drawing is broken into simple shapes and easy-to-follow steps.
Q3. How can I make my dog drawing look cuter?
Focus on large expressive eyes, rounded paws, floppy ears, and soft, curved lines. These features instantly make a puppy illustration look more adorable and full of personality.
Q4. Do I need to add colors to complete the dog artwork?
Coloring is optional, but adding warm colors, soft shading, and highlights can make your cartoon dog look more vibrant, polished, and realistic.
Q5. Can I draw this puppy in different poses or styles?
Absolutely! Once you understand the basic structure, you can create your dog sketch in sitting, running, sleeping, or playful poses, and even experiment with different cartoon styles.
Learn More About Cute Dog Drawing
Cartoon Dog drawing is one of the best ways to practice smooth lines, balanced proportions, and expressive character design.
By learning how to sketch floppy ears, rounded paws, bright eyes, and playful body shapes, you’ll build strong drawing fundamentals while creating artwork that feels full of life and personality.
As you practice more puppy illustrations, you’ll gain confidence, improve your line control, and develop your own unique cartoon drawing style.
Ready to improve faster?
Try these easy tutorials next and build your drawing skills step by step.



Don't miss these Free Printable fun Coloring Pages!
Why You Can Trust Draw Easy Fun
At Draw Easy Fun, we have been creating high-quality, easy-to-follow drawing tutorials since 2020, and launched this platform in 2025 with a simple mission—to make drawing easy, fun, and accessible for everyone.
What sets us apart is our fresh, trend-focused approach. Every tutorial is designed based on what learners need today, so you always get clear and up-to-date guidance.
Written by Dimo (Certified Artist), our team of experienced and certified artists has been teaching since 2015, including offline classes. We know how to break down complex drawings into simple steps that beginners can easily follow.
Our goal is simple:
To show you how easy drawing can be when taught the right way.
We believe drawing is for everyone—no matter your age or skill level. That’s why we continuously create beginner-friendly tutorials and coloring pages to help you improve with confidence.
You can rely on Draw Easy Fun for simple, clear, and effective drawing tutorials that truly help you learn and grow.
Learn how to draw simple and free step-by-step drawing tutorials for kids and beginners! On draweasyfun.com, you will learn how to draw animals, plants, objects, and popular cartoon characters with easy-to-follow instructions. So what are you waiting for! Check Out Now!