How to Draw an Ice Cream Step by Step (Easy Guide for Kids & Beginners)
Drawing an ice cream is super fun and perfect for beginners! In this guide, you’ll learn how to create a cute and simple ice cream that looks delicious and colorful.
Difficulty Level: Easy
Time Needed: 30Minutes
Material Needed:
- Pencil & Eraser – for sketching and fixing mistakes.
Drawing Paper – plain white or sketchbook page.
Colors – use crayons, color pencils, or markers.
Black Marker – to outline the Ice Cream.
Sharpener – to keep your pencil ready.
Color Needed:
- Topping (Cherry): Red
- Sprinkles: Green, Blue, Yellow, and Pink (Use light Colors)
- Melting Chocolate: Dark Brown
- Scoops: Light Brown, Green, and Pink
- Cone: Light Brown
Interesting Facts About Ice Cream
- Ice Cream Was Invented 2,500 Years Ago!
- Ice cream was once so expensive that only kings and rich people could afford it!
- The cone was popularized during a fair when a seller ran out of cups.
- Vanilla is the most loved ice cream flavor worldwide.
- The biggest ice cream sundae ever made weighed over 24 tons.
- Chocolate syrup is the most popular topping on ice cream.
- The astronauts used to eat freeze-dried ice cream in space.
- Cows produce the milk for most of the ice cream we eat!
If you want to learn more, click here: Ice Cream
Step-By-Step instruction for Easy Ice Cream Drawing
The final result of our Easy Ice Cream Drawing will look something like this:
Download drawing PDF for Free, Learn and draw Ice Cream with help of easy Instructions
Step 1: Draw the Base Curve
- Start by drawing a smooth curved line like a wide “U” shape. Then extend both ends slightly upward with short slanted lines.
- This shape forms the bottom part of the ice cream scoop or the top edge of the cone, so keep the curve soft and rounded.
Step 2: Draw the Cone Shape
- From both ends of the curve, draw two straight lines going downward and slightly inward.
- Then connect the bottom with a small, rounded curve to form a pointed cone shape.
Step 3: Draw the Ice Cream Scoop
- On top of the cone, draw a big, rounded shape for the scoop.
- Then add wavy, bumpy edges along the sides and bottom to create a soft, creamy texture.
Step 4: Add the Second Scoop Layer
- Draw another wavy curved line across the middle of the ice cream.
- This makes a second layer, making it look like a double scoop.
Step 5: Add the Top Scoop Detail
- Draw another wavy curved line near the top scoop.
- This gives the ice cream more depth and makes it look like multiple creamy layers stacked together.
Step 6: Draw the Melting Drip
At the top scoop, draw a wavy dripping line going up and down like melted ice cream.
Make the drips uneven—some longer, some shorter—to give it a realistic melting effect.
Step 7: Add Texture Details
- Draw small, short, curved lines all over each scoop.
- These little lines give the ice cream a soft, fluffy, and creamy texture.
Step 8: Add Toppings (Cherry & Sprinkles)
- Draw a small circle on top for the cherry and add a curved line for the stem.
- Then draw tiny ovals and dash shapes on the top scoop to create colorful sprinkles.
Step 9: Add the Crisscross Pattern & Final Touches
- Draw crisscross diagonal lines on the cone to create a waffle pattern.
- Then add small sparkle shapes around the ice cream to make it look cute and eye-catching.
Step 10: Color Your Ice Cream
Now bring your drawing to life with a splash of color!
- Color the top scoop chocolate brown and add colorful sprinkles.
- Use a cream or light beige color for the second scoop.
- Make the third scoop mint green.
- Color the bottom scoop pink (strawberry flavor).
- Fill the cone with light brown and golden shades for a waffle look.
- Color the cherry bright red with a green stem.
- Add soft shading to make it look more 3D and realistic.
Don’t forget to color the sparkles with fun, bright colors
Great job!
You’ve completed your Ice Cream drawing step by step
Amazing job! You’ve created a super cute and delicious ice cream drawing—keep practicing and try your own crazy flavor combos next time!
Ice Cream Drawing Process Overview – From Start to Finish
Tips for Drawing an Ice Cream
- Start with light pencil strokes so you can erase easily.
- Use simple shapes like triangles and circles first.
- Keep your lines smooth and neat.
- Add cute details like sprinkles or a smiley face.
- Color creatively—ice cream can be any color you like!
Frequently Asked Questions (FAQ)
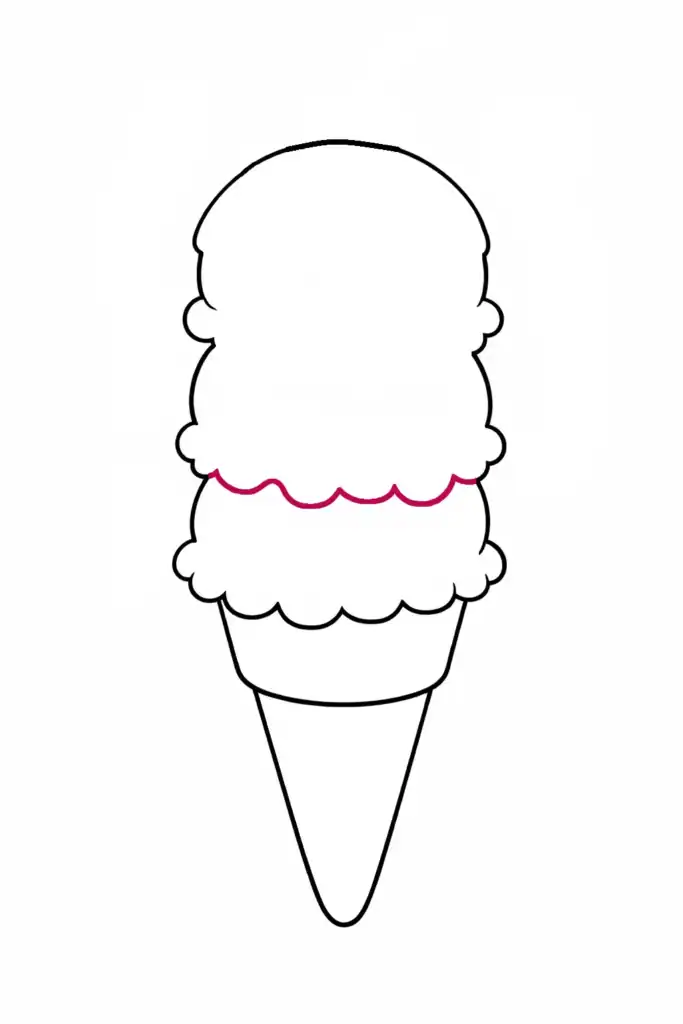
Q1. How do you draw an ice cream step by step?
Start by drawing a cone shape, then add a scoop on top. After that, add details like texture, toppings, and color it nicely.
Q2. Is ice cream drawing easy for beginners?
Yes! Ice cream is one of the easiest things to draw because it uses simple shapes.
Q3. What shapes are used to draw an ice cream?
A triangle for the cone and a circle or curved shape for the scoop.
Q4. How can kids make their ice cream drawing look cute?
They can add eyes, a smile, and colorful sprinkles to make it look fun and adorable.
Q5. What colors should I use for an ice cream drawing?
You can use any colors—pink, brown, yellow, or even rainbow for a creative look!
Try or Download these Easy Coloring Pages!
Festival Icons Drawing!
Our Popular Drawing!
Learn how to draw simple and free step-by-step drawing tutorials for kids and beginners! On draweasyfun.com, you will learn how to draw animals, plants, objects, and popular cartoon characters with easy-to-follow instructions. So what are you waiting for! Check Out Now!
