Learn How to Draw Grapes

Last Update On: June 13, 2026 | Posted On: June 13, 2026

Learn how to draw Grapes with this easy step-by-step guide designed for kids and beginners. Even if you’ve never drawn before, you’ll be able to create a colorful bunch of grapes using simple shapes and smooth lines.

This tutorial includes clear steps, helpful tips to improve your drawing, and common mistakes to avoid—so you can draw with confidence and get better results every time.

Difficulty Level: Easy

Time Needed: 27-29 Minutes

Material Needed:
  • Pencil & Eraser – for sketching and fixing mistakes
  • Drawing Paper – plain white paper or a sketchbook
  • Colors – crayons, colored pencils, or markers
  • Black Marker – for outlining the Grapes.
  • Sharpener – to keep your pencil ready
Colors Used in This Grapes Drawing:
  • Grapes: Purple (Use Light Shade for Shiny effect).
  • stem: Brown
  • Leaf: Green

Before You Start Drawing

  • Keep your pencil light – you’ll erase guidelines later
  • Draw on a flat, clean surface
  • Keep your colors ready (Purple, Green, and Brown)
  • Don’t worry about perfection – practice makes progress

Step-By-Step instructions for Grapes Drawing

Finished-bunch-of-grapes-drawing-colored-purple-with-a-green-leaf,-brown-stem,-and-shiny-highlights.

Download your free PDF guide and learn how to draw grapes with easy step-by-step instructions.

Step 1: Draw the First Grape

First-grape-circle-with-two-curved-guide-lines-for-a-bunch-of-grapes-drawing-tutorial.
  • Start by drawing a medium-sized circle near the bottom center of your paper.
  • Then add two short curved lines extending upward from each side of the circle.
  • These curved lines will help shape the grape bunch in the next steps.

Tip: Try to keep the circle as round as possible, but don’t worry if it’s not perfect. Natural grapes often vary slightly in shape.

Step 2: Add More Grapes Around the Center

Five-overlapping-grape-shapes-forming-the-beginning-of-a-bunch-of-grapes-drawing.
  • Draw three more grape shapes around the first circle.
  • Place one grape on each side, one above, and keep them slightly overlapping to start forming a bunch of grapes.
  • You only need to draw the visible portions of the circles where the grapes overlap.

Avoid: leaving large gaps between the grapes. Keeping them close together will make the bunch look fuller and more natural.

Step 3: Build the Top of the Grape Bunch

Additional-grapes-added-to-the-top-of-a-bunch-of-grapes-drawing-to -create-a-fuller-cluster.
  • Add two more grapes above the existing row to expand the bunch upward.
  • Draw curved circular shapes that slightly overlap the grapes below, creating a compact cluster.
  • The grape bunch should now start looking fuller and more balanced.

Tip: Let the grapes overlap naturally. Small overlaps help create the appearance of a real bunch of grapes instead of separate circles.

Step 4: Add the Outer Grapes

Grape-cluster-with-side-grapes-and-a-top-grape-added-to-complete-the-bunch-shape.
  • Draw one grape on the left side and another on the right side of the cluster.
  • Then add a grape at the very top center to complete the rounded shape of the bunch.
  • These additional grapes help make the cluster look fuller and more realistic.

Avoid: making all the grapes the same size. Small size differences can make the bunch look more natural and visually interesting.

Step 5: Fill in the Top Grapes

Nearly-complete-bunch-of-grapes-drawing-with-additional-grapes-added-across-the-top-row.
  • Add the remaining grapes across the top of the cluster.
  • Draw two large overlapping circles near the upper-left and upper-right sides.
  • Then add a small curved section between them to show another grape partially hidden behind the front grapes.

Tip: Not every grape needs to be fully visible. Drawing a few partially hidden grapes helps create depth and makes the bunch look more realistic.

Loved this Easy Grapes drawing? Try these easy tutorials next and level up your skills!

Step 6: Draw the Grape Stem

Bunch-of-grapes-drawing-with-a-curved-stem-added-at-the-top-of-the-grape-cluster.
  • At the top center of the bunch, draw a curved stem extending upward.
  • Add a few connecting lines where the stem meets the grapes to show how the fruit is attached.
  • This detail helps turn the cluster of circles into a recognizable bunch of grapes.

Avoid: making the stem too thick or too long. A slim, gently curved stem will look more natural and keep the focus on the grapes.

Step 7: Add a Leaf to Finish the Outline

Bunch-of-grapes-drawing-with-a-large-leaf-added-to-the-stem,-completing-the-outline.
  • Draw a large leaf attached to the top of the stem.
  • Use two smooth curved lines that meet at a pointed tip to create a simple leaf shape.
  • This final outline detail completes the bunch of grapes and prepares the drawing for coloring.

Tip: Make the leaf slightly larger than a single grape so it stands out and balances the overall drawing.

Step 8: Add Veins to the Leaf

Bunch-of-grapes-drawing-with-detailed-leaf-veins-added-to-the-leaf-at-the-top.
  • Draw a curved line through the center of the leaf to create the main vein.
  • Then add several smaller veins branching out from both sides.
  • These simple details give the leaf more texture and make the grape drawing look more complete.

Avoid: Don’t draw the veins too thick or perfectly straight. Light, gently curved lines will make the leaf look more natural.

Step 9: Color and Shade the Grapes

Finished-bunch-of-grapes-drawing-colored-purple-with-a-green-leaf,-brown-stem,-and-shiny-highlights.
  • Color each grape purple and add lighter highlight spots to give them a shiny appearance.
  • Color the stem brown and the leaf bright green.
  • You can also add slightly darker shades along the edges of the grapes to create depth and make the bunch look more three-dimensional.

Tip: Leave a small light area on each grape before coloring. These highlights help the grapes look glossy and fresh.

Great Job!
You've Completed Your Grapes Drawing

Nice work! You’ve drawn a colorful bunch of grapes from start to finish. Keep practicing your drawing skills and try creating more fruit drawings to improve your shapes, coloring, and shading. The more you draw, the more confident you’ll become!

Grapes Drawing Process Overview – From Start to Finish

Easy-Grapes-Drawing-Start-to-Finish-Drawing-Process-Overview.

Tips for Better Grapes Drawings

  • Draw your grape circles close together to create a full bunch.
  • Let some grapes overlap to add depth and make the cluster look more realistic.
  • Use light pencil lines first so you can easily fix mistakes.
  • Add small highlights to each grape to make them look shiny.
  • Try using different shades of purple for a more colorful and detailed drawing.
  • Keep the leaf and stem simple so the grapes remain the main focus.

Common Mistakes to Avoid

  • Leaving large gaps between the grapes.
  • Drawing every grape the same size.
  • Making the bunch too wide or too flat.
  • Forgetting to overlap some of the grapes.
  • Drawing a stem that is too thick compared to the grapes.
  • Coloring all the grapes with the same shade and no highlights.

Remember, real grape bunches are not perfectly symmetrical, so small differences can make your drawing look more natural.

Time breakdown for Each Step

StepWhat You DoTime
Step 1Draw the first grape (circle + curved lines)2 min
Step 2Draw 3 more grapes around it (sides + top)3 min
Step 3Add 2 more grapes above the first row2 min
Step 4Add grapes on left, right, and top center3 min
Step 5Add remaining grapes across the top (overlapping)3 min
Step 6Draw the curved stem at the top2 min
Step 7Draw the large leaf2 min
Step 8Add leaf veins (center + small side veins)2 min
Step 9Coloring (purple grapes + highlights, brown stem, green leaf)8–10 min
Total 27–29 minutes

Pro Tip for Parents/Teachers

Age GroupExpected Time
4–6 years (with help)30–35 min
7–10 years (alone)25–30 min
11+ years / Adults20–25 min

Frequently Asked Questions

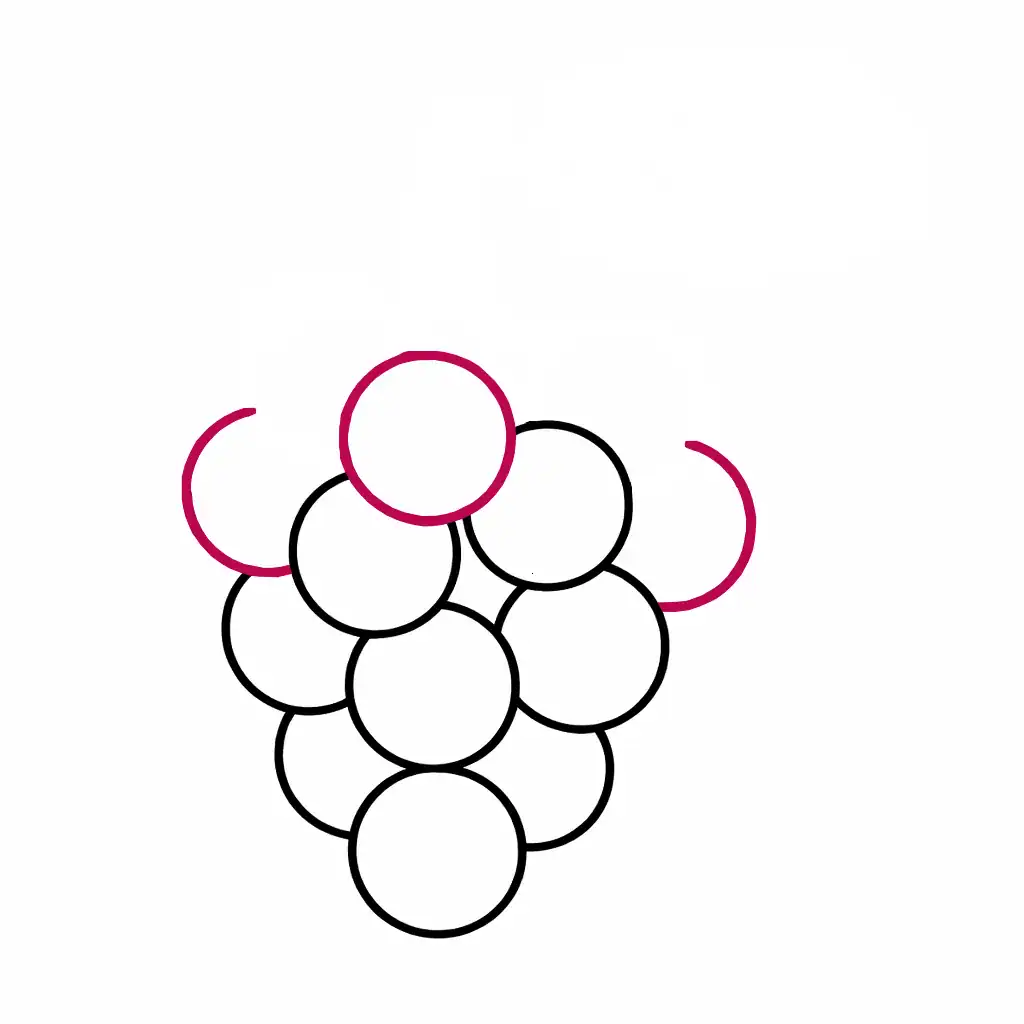
Q1. How do you draw grapes step by step?

Start by drawing a few circles for the grapes. Continue adding more overlapping circles to form a bunch, then draw the stem and leaf. Finish by coloring and adding highlights.

Q2. Is this grapes drawing suitable for kids?

Yes! This grapes drawing tutorial uses simple shapes and easy steps, making it a great drawing activity for kids.

Q3. Can beginners draw grapes easily?

Absolutely. Since grapes are mostly made from circles, this is one of the easiest fruit drawing tutorials for beginners.

Q4. What colors should I use for grapes?

Purple is the most common color, but grapes can also be green, red, or dark blue, depending on the variety.

Q5. How can I make my grapes look more realistic?

Add highlights, use multiple shades of color, and overlap some of the grapes to create depth.

Q6. Why do my grapes not look like a bunch?

The grapes may be spaced too far apart. Try drawing them closer together and overlapping them slightly.

Q7. What should I draw after grapes?

Once you’ve finished your grape drawing, you can try other fruit drawings like apples, bananas, cherries, or strawberries.

Learn More About Grapes Drawings

Grapes grow in clusters on vines and come in many colors, including purple, green, red, and black. Because they are made up of simple round shapes, grapes are one of the easiest fruits for beginners to draw.

As you improve, you can experiment with different grape colors, larger fruit baskets, or realistic still-life drawings. Learning how to draw grapes is also a great way to build confidence before moving on to more detailed fruit and food drawings.

Ready to improve faster?
Try these easy tutorials next and build your drawing skills step by step.

Why You Can Trust Draw Easy Fun

At Draw Easy Fun, we have been creating high-quality, easy-to-follow drawing tutorials since 2020, and launched this platform in 2025 with a simple mission—to make drawing easy, fun, and accessible for everyone.

What sets us apart is our fresh, trend-focused approach. Every tutorial is designed based on what learners need today, so you always get clear and up-to-date guidance.

Written by Dimo (Certified Artist), our team of experienced and certified artists has been teaching since 2015, including offline classes. We know how to break down complex drawings into simple steps that beginners can easily follow.

Our goal is simple:
To show you how easy drawing can be when taught the right way.

We believe drawing is for everyone—no matter your age or skill level. That’s why we continuously create beginner-friendly tutorials and coloring pages to help you improve with confidence.

You can rely on Draw Easy Fun for simple, clear, and effective drawing tutorials that truly help you learn and grow.

Learn More About Draw Easy Fun

Learn how to draw simple and free step-by-step drawing tutorials for kids and beginners! On draweasyfun.com, you will learn how to draw animals, plants, objects, and popular cartoon characters with easy-to-follow instructions. So what are you waiting for! Check Out Now!

Scroll to Top