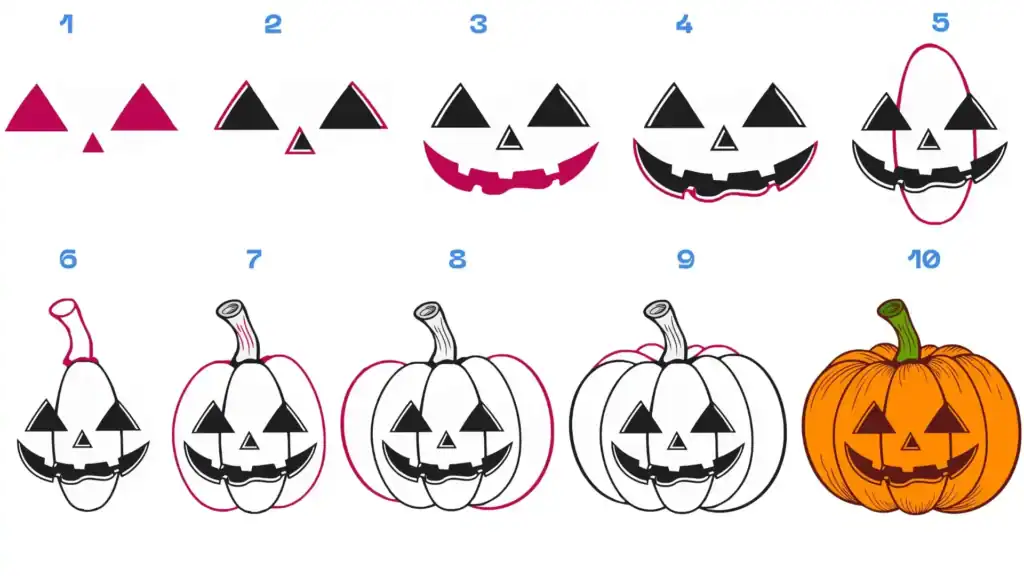
How to Draw The Halloween Pumpkin
Easy drawing for kids and beginners, Simple pumpkin drawing step by step
Also, learn the History and some interesting facts about the Halloween Pumpkin.
Difficulty Level: Easy
Time Needed: 45 Minutes
Material Needed:
- Pencil & Eraser – for sketching and fixing mistakes.
Drawing Paper – plain white or sketchbook page.
Colors – use crayons, color pencils, or markers.
Black Marker – to outline the pumpkin.
Sharpener – to keep your pencil ready.
Colors to Use:
Orange (pumpkin), Green (stem), Black (eyes & mouth), and Yellow (for glow).
History and Origin of the Halloween Festival
Halloween Origin –
The Halloween originated from an ancient European festival called “Samhain” (pronounced “Sow-in”). Today, Halloween is celebrated in many cities around the world, such as:
Derry (Northern Ireland), Edinburgh (Scotland), Dublin (Ireland), Transylvania (Romania), London (England), Amsterdam (Netherlands), Prague (Czech Republic), Paris (France), Venice (Italy), Corinaldo (Italy), Barcelona (Spain), and many other cities. People also start celebrating it in the Middle East, including Saudi Arabia, where people have begun celebrating it as well.
Celtic Belief – The Celtic people of Wales believed that once a year, there is a special night when the curtain between the living and the dead lifts, allowing the dead to return to the earth.
Masks & Bonfires – In those days, people wore scary masks and clothes to protect themselves from evil spirits. They also lit bonfires at night, which has now become a tradition in today’s Halloween celebrations.
Pumpkin Carving – Pumpkins were added to Halloween when it became a traditional festival in the US and Europe. Earlier, people carved turnips, but later they switched to pumpkins because they were easier to find.
Christian Church Influence – Many years later, the Christian Church called the night before All Saints Day “All Hallows’ Eve.” Over time, this name changed and became “Halloween.”
Trick or Treat – In Medieval Europe, people went door to door singing or offering prayers, and in return, they were given food. This custom has evolved into today’s “Trick or Treat.”
To read more about the history of “Halloween”, visit here: HISTORY OF HALLOWEEN
Watch movies based on “Halloween”:
- For Adults: The Real Story Of Halloween
- For Kids: The Halloween Tree
Step By Step Instructions To Draw The Halloween Pumpkin
the Final result of our Halloween pumpkin will look something like this

Step 1: Draw the Eyes and Nose

- First, draw a triangle on the left side. This will be one eye.
- Now, add another triangle on the right side. Make it the same size as the first one.
- Between the two eyes, make a smaller triangle — this will be the pumpkin’s nose.
- Color all three triangles black.
Step 2: Draw Parallel line around the eyes and nose

- Now draw a line parallel to the triangle, leaving a little space, so that it looks like the inner part of the eyes and nose
Step 3: Draw the Mouth

- Next draw a big curved line under the nose — like a wide smile.
- Then, make another curved line below it to form the bottom of the mouth.
- Join the ends of both curved lines to close the mouth shape.
- Finally, add a few small square shapes for the teeth, inside the mouth — these are the pumpkin’s teeth.
- Color the inside of the mouth black, but leave the teeth white
Step 4: Draw a line under the mouth

- Draw a small curved line just below the pumpkin’s mouth.
- Make sure the line follows the shape of the mouth — not too close and not too far.
- Suggestion:
Keep your hand steady and draw the line smoothly so it looks like a shadow or a smile line under the mouth.
Step 5: Draw the first half of the pumpkin’s body

- Now, draw a big curved line around the eyes and mouth.
- Start from one side of the pumpkin’s mouth, go up and over the eyes, then come down to the other side of the mouth.
Suggestion:
Make sure, draw the curve slowly and make it smooth — this line will form the first half of your pumpkin’s round shape.
Step 6: Draw the stem (peduncle) of the pumpkin

- First, draw a short and slightly curved stem on top of the pumpkin.
- Then, make the stem a bit thick and give it a small opening at the top to make it look real.
- Finally, you can bend the stem a little to one side — it will make your pumpkin look more natural and fun!
Step 7: Add details to the stem and pumpkin body

- Now, let’s make your pumpkin look more real and full!
- Draw curved lines on the stem – Add 2–3 small curved lines from top to bottom on the stem. These lines add texture and give it a natural appearance.
- To add two side curves to the pumpkin, and then draw two big curved lines on each side of the pumpkin’s face. These curves make the pumpkin look round and full.
Step 8: Draw the last two parts of the pumpkin’s body

- At this stage, complete the pumpkin by adding two more big curved lines — one on each side of the pumpkin.
- These lines will finish the round shape and make your pumpkin look full and complete.
Step 9: Draw the back part of the pumpkin

- Next, draw a few curved lines behind the pumpkin to complete its back side.
- These lines should start from the top near the stem and curve down gently, following the pumpkin’s round shape.
Suggestion:
Make the back lines a little lighter than the front ones. This will help show that they are behind and give your pumpkin a 3D look.
Step 10: Add details to the pumpkin’s body

Finally, it’s time to give your pumpkin its final look!
Draw small curved lines from the top of the pumpkin near the stem, going down along each section. These lines show folds and make the pumpkin look real.
Once done, add a few short lines at the bottom to show where the pumpkin touches the ground.
Make some lines darker or thicker to give the pumpkin more shape and depth.
Tip:
Keep your strokes light and smooth. The lines should follow the pumpkin’s curves — this will make it look round, full, and ready for Halloween
Step 11: Color your Halloween pumpkin

Great, It’s time to bring your pumpkin to life with bright colors!
For the Color pumpkin’s body, orange:
Use a light orange shade for the main part and a little darker orange near the lines to give it a nice 3D look.To Color the stem green:
Use a bright green for the main part and add a bit of dark green near the edges to show depth.Fill the eyes, nose, and mouth with black:
This will make your pumpkin look spooky and ready for Halloween!
Bonus:
If you are using crayons or color pencils, color slowly in one direction so it looks smooth.
You can also add a little yellow glow inside the mouth and eyes to make it look like a glowing Jack-o’-lantern.Great job! You have completed your Halloween pumpkin drawing — it looks amazing and full of life!
Great job! Ready for your next masterpiece? Try one of our other easy drawing ideas and keep improving your skills!
What to do next!
Learn how to draw simple and free step-by-step drawing tutorials for kids and beginners! On draweasyfun.com, you will learn how to draw animals, plants, objects, and popular cartoon characters with easy-to-follow instructions. So what are you waiting for! Check Out Now!
